Writing the troubleshooting flow
The step types and which to pick
Section titled “The step types and which to pick”Every entry in topic.steps[] has a type field. There are five, and they map directly to what the technician is supposed to do next with the aircraft in front of them — at the partner site if the aircraft is still docked, or in a maintenance cell at the hub if it has been pulled out of service.
action— do this work. A concrete physical or software task with no branching: replace the harness, reseat the connector, run the template.question— pick a branch. A diagnostic decision point that routes the technician to a different next step based on what they observe in the alarm report or on the aircraft.escalation— stop and page someone. The technician has worked through the steps and needs the on-call engineer who owns this failure mode; route through[[EscalationPath:<id>]].reference— read this, then continue. Informational context the technician needs before the next action — a dashboard legend, a return-to-service disposition, a definition. It does not, by itself, ask the technician to do anything to the aircraft.telemetry— embed a Baraza log plot inline. The technician enters the requested identifier and the plot renders in place instead of sending them away to find it.
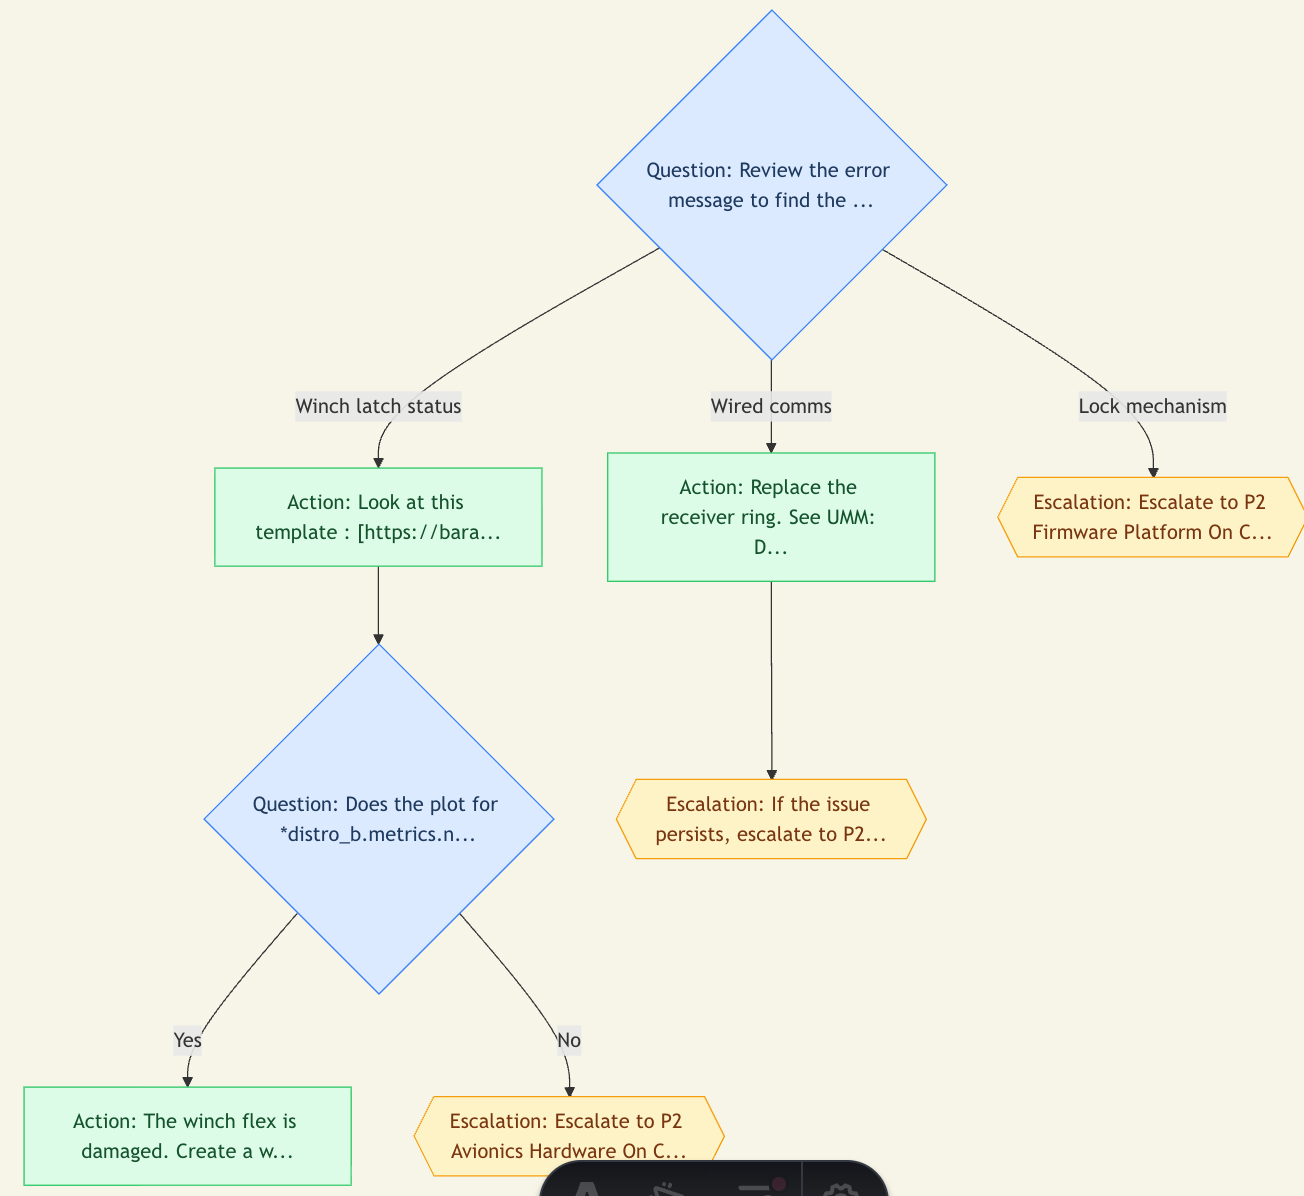
The same example topic (0x00100194 ZIP_EXECUTIVE_V4_DROID_PARTIALLY_CONSTRAINED) carries the first three of these. We pull reference from a sibling topic on the next slides, and telemetry is covered end-to-end in Section 8.
Rendered step-type example
What step type do you want to learn about?
action - do this work
Use action when the technician has a single, unambiguous task to perform. No branching, no decision. If a fix actually requires three sub-steps, that is three action steps wired together with next, not multiple tasks in one step.
The text field is exactly what the technician reads off the page. Embed links inline with regular Markdown, and link only to controlled documents or sources: another troubleshooting topic or procedure, a maintenance manual section, or a baraza2.platform.flyzipline.com page or template. Do not link a published troubleshooting step to a Google Doc, Confluence page, draft note, or other uncontrolled source. Keep the text short enough that a tired technician at the end of a shift gets it right the first time.
If the task already exists as a reusable procedure in site/src/content/docs/procedures/, link to that procedure instead of copying its steps into the topic. Use a normal Markdown link inside the action text, such as [Power Cycle Aircraft](/procedures/power-cycle-aircraft/); do not use type: "reference" only to point at a shared procedure.
{
  id: "wired-comms-replace-the-receiver-ring",
  type: "action",
  text: "Replace the receiver ring. See UMM: Droid Receiver Ring Maintenance Instructions.",
  next: "wired-comms-if-the-issue-persists-escal",
}
question - pick a branch
Use question when the alarm report or an observation should route the technician down one of several paths. The options array carries the branches; each option has a label the technician clicks and a next pointing to the step they land on.
When the next action depends on what the reader observes, use a clear question rather than a statement. For example, instead of “Confirm that the switch is on.” ask “Is the switch on?” and provide a path for both Yes and No. Each answer must lead to a clear action, another question, or an outcome. Click through every option to confirm that no answer leaves the reader stranded.
Question example
Is the switch on?
- Yes: Continue to the next documented check.
- No: Follow the documented troubleshooting steps for a switch that is off.
Only add a branch when there's a real decision the technician has to make. If two paths really do the same thing, collapse them. The flow diagram later in this section is your sanity check for this.
{
  id: "review-the-error-message-to-find-the-re",
  type: "question",
  text: "Review the error message to find the reason that the Droid is not stowed, then see the relevant option below.",
  options: [
    { label: "Winch latch status", next: "winch-latch-status-look-at-this-templat" },
    { label: "Wired comms",        next: "wired-comms-replace-the-receiver-ring" },
    { label: "Lock mechanism",     next: "lock-mechanism-escalate-to-p2-firmware" },
  ],
}
escalation - stop and page someone
Use escalation when the technician has worked the documented steps and needs an on-call engineer who owns this failure mode. Never hardcode a Slack channel, an email, or a person's name in the text. Those go stale. Always use the [[EscalationPath:<id>]] shortcode, which resolves at build time from site/src/data/escalation-paths.json and is validated against live Slack on every pull request and nightly.
An escalation step is usually a leaf with no next, because the next move belongs to the on-call, not the technician.
{
  id: "escalate-to-p2-avionics-hardware-on-cal",
  type: "escalation",
  text: "Escalate to [[EscalationPath:p2-avionics-hardware]].",
}
reference - read this, then continue
Use reference for context the technician needs before the next action: a dashboard legend, a disposition statement, a definition of terms. It does not ask the technician to do anything to the aircraft on its own. Pair it with a next so the flow continues to a real action, question, or escalation.
This example is adapted from 0x00020010 DROID_ERROR_PORTAL_WINCH_ASCENT_FAILED. The disposition, "the aircraft may return to service," is informational; the next step handles the case where the failure repeats.
{
  id: "the-aircraft-may-return-to-service",
  type: "reference",
  text: "The aircraft may return to service.",
  next: "if-the-failure-repeats-escalate-to-p2-droid",
}
telemetry - embed a Baraza view inline
Use telemetry when the reader needs a Baraza view directly inside the troubleshooting flow. It is a fifth step type alongside action, question, escalation, and reference.
It exists to remove a context switch. If a step would otherwise say "open Baraza, apply this template to the mission, look for X," use a telemetry step instead. The reader enters the needed identifier inside the step, and the bound Baraza view renders in place.
Telemetry data shape
A telemetry step is a single node, exactly like an action step: an id, a text, and an optional next. It adds structured fields that bind the step to a Baraza view.
{
  id: "open-the-winch-temperature-check-plot",
  type: "telemetry",
  mode: "log",
  template: "winch_temperature_check",
  promptFor: "mission_id",
  text: "Apply the winch_temperature_check template to the failing mission. The plot below shows the winch board temperature against the ambient-temperature threshold over the mission. If the maximum board temperature stays under the threshold, the validator failure is spurious.",
  next: "did-the-board-temperature-stay-under-threshold",
}type-"telemetry".mode-"log","live", or"maintenance_validators".template- the Baraza template identifier. Required forlogandlivetelemetry steps.promptFor-"mission_id","charging_span_id","asset_time_range", or"baraza_log_url"forlog;"mission_id"formaintenance_validators;"smart_cart_hostname"forlive.timeWindowHours- optional forpromptFor: "asset_time_range"; when positive, the reader enters an affected asset ID plus an alarm date and time, and the renderer derives the preceding fixed window automatically.liveWorkspaceV2- required only formode: "live". This is the captured Baraza workspace state from the live view.id,text, andnext- work the same way they do on anactionstep. Thetextframes what the reader is looking at;nextchains onward to the following step.
mode, template, promptFor, and liveWorkspaceV2 are valid only on a telemetry step. The schema rejects them on the other four step types.
What the reader sees
The step renders in three states.
- Before submit. The step prose, an input for the required identifier, and a submit button. A placeholder shows where the Baraza view will appear.
- Loading. Submit disables and the placeholder shows a brief loading state while the data is fetched.
- Loaded. The embedded view replaces the placeholder, with the identifier still visible above it and an option to change it.
Loaded telemetry step example
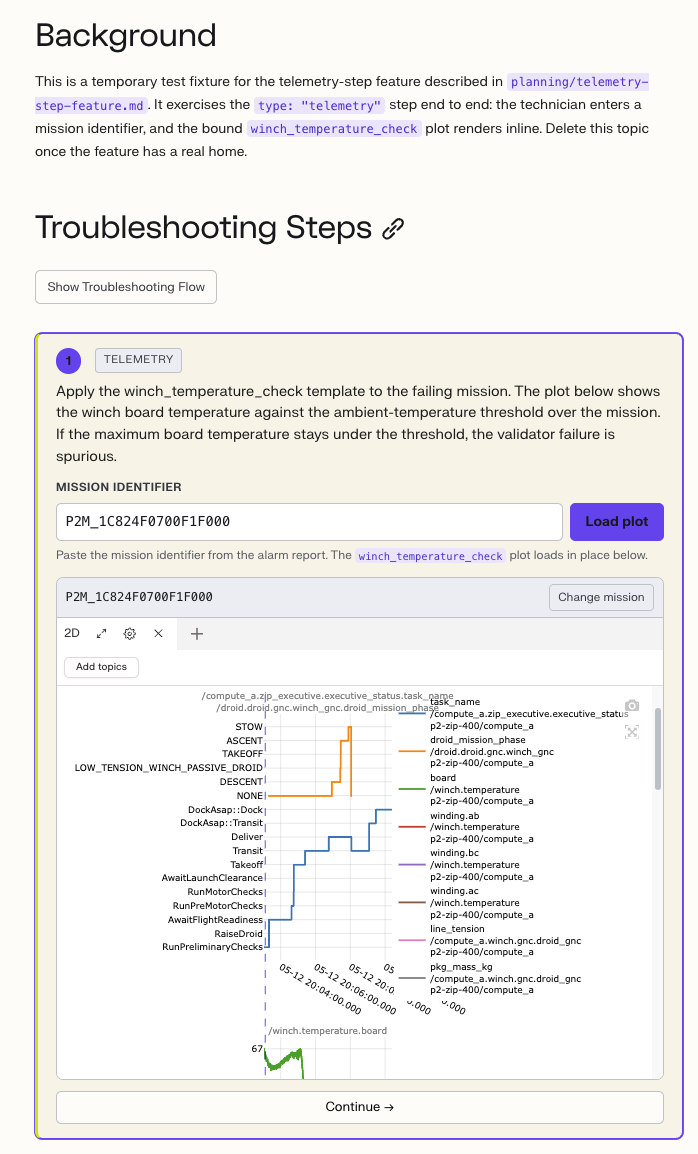
The text field explains what the reader is looking at and why. After they use the Baraza view, the Continue button takes them to the next step just like an action step.
How to pick the telemetry mode
Use the mode that matches the Baraza view the reader needs.
| Mode | Use when | Required prompt |
|---|---|---|
log | The reader needs a historical Baraza log plot for a mission, charging-session span, explicit asset/time range, or incident time range. | mission_id, charging_span_id, asset_time_range, or baraza_log_url |
live | The reader needs a live ZipViz view from a Smart Cart. | smart_cart_hostname |
maintenance_validators | The reader needs failed maintenance validator results for a mission. | mission_id |
Asset and UTC time ranges
Use promptFor: "asset_time_range" when the event falls outside a mission or charging span. By default, the reader enters one or more comma-separated asset IDs plus an explicit UTC start and end time. Add a positive timeWindowHours value when the reader should enter an affected asset ID plus an alarm date and time and the renderer should derive the preceding fixed window.
{
  id: "review-dock-telemetry",
  type: "telemetry",
  mode: "log",
  template: "not-near-dock-troubleshooting",
  promptFor: "asset_time_range",
  text: "Review the plotted signals over the affected period.",
}
Do not convert local time in the topic text. The rendered fields are labeled UTC, and the end time must be later than the start time.
The template value is not a free label. Use the real Baraza identifier for the view, not a human-readable title you invent. If you only know the display name, resolve it before authoring the step.
For live telemetry steps, capture the Baraza live workspace state and add it as liveWorkspaceV2. That blob lets the embedded view open the intended panels and signals.
The Codex skill
The repo ships a Codex skill, convert-baraza-prose-to-telemetry-step, for migrating existing topics. Point it at a topic file with a step that tells the reader to open a named Baraza template, and it rewrites that step as a telemetry step: it changes the type, adds the structured fields, and preserves the interpretation guidance in text while dropping the now-redundant "go to Baraza" mechanics.
Use it when an existing step names a specific Baraza template. It works one step at a time and surfaces the change for your review; it does not batch conversions, and it does not author net-new telemetry steps. If a step names no specific template, or points at Baraza for something other than an embeddable view, the skill leaves it alone and tells you.
next and options — how the flow wires together
Section titled “next and options — how the flow wires together”Two fields connect steps into a graph. The pull-request check fails if the graph is broken (orphan step, dangling next, multiple entry points).
next: "<step-id>"— single edge. Used byaction,reference, and occasionallyescalationwhen there’s a follow-on step after paging. The id must match another step’sidexactly.options: [{ label, next }, ...]— multiple edges. Used byquestiononly. Eachlabelis the button the technician sees; eachnextis the step they land on.- No
nextand nooptions— leaf step. Common forescalationand for a terminalactionlike “return the aircraft to service.” steps[0]is the entry point. Every other step must be reachable from it; the connectivity check enforces this on every pull request.
The ids are slugs of the step text, not human-meaningful names. That is deliberate — they’re generated and only the validator reads them.
Flow UI readability
Section titled “Flow UI readability”Flow readability is a final topic quality check, not a step type. After arranging next and options[].next, use Guide content checklist: Flow UI readability to confirm the rendered UI keeps normal reader paths moving down the page.
Tables — keep long lookups searchable
Section titled “Tables — keep long lookups searchable”Use tables for lookup or reference data, not for ordinary troubleshooting flow. If the reader needs to choose a branch from the table, consider whether those choices should become question options instead.
Small tables are fine inline. Once a table has more than about 20 rows, do not leave it as one long page-length table. Ask Codex to add a search box above the table and wrap the table in a scroll area so the reader can search across any column without losing their place on the page.
The finished table should keep all rows in the source, cap the visible table height, support horizontal scrolling when the columns are wide, and keep the header visible while the body scrolls.
Notes and cautions
Section titled “Notes and cautions”Use Starlight note, caution, and warning blocks for short callouts that should stand apart from the main troubleshooting path.
:::noteHelpful context or reference links.:::
:::cautionImportant limitation, warning, or condition before proceeding.:::
:::danger[Warning]Safety-critical or equipment-risk condition before proceeding.:::
Note, caution, and warning examples
Notes use a blue left border, light blue background, information icon, and bold Note title. Cautions use an orange left border, pale yellow background, warning icon, and bold Caution title. Warnings use the red danger block with a Warning title. Keep these blocks concise, and do not use them for normal troubleshooting steps.
The rendered flow diagram
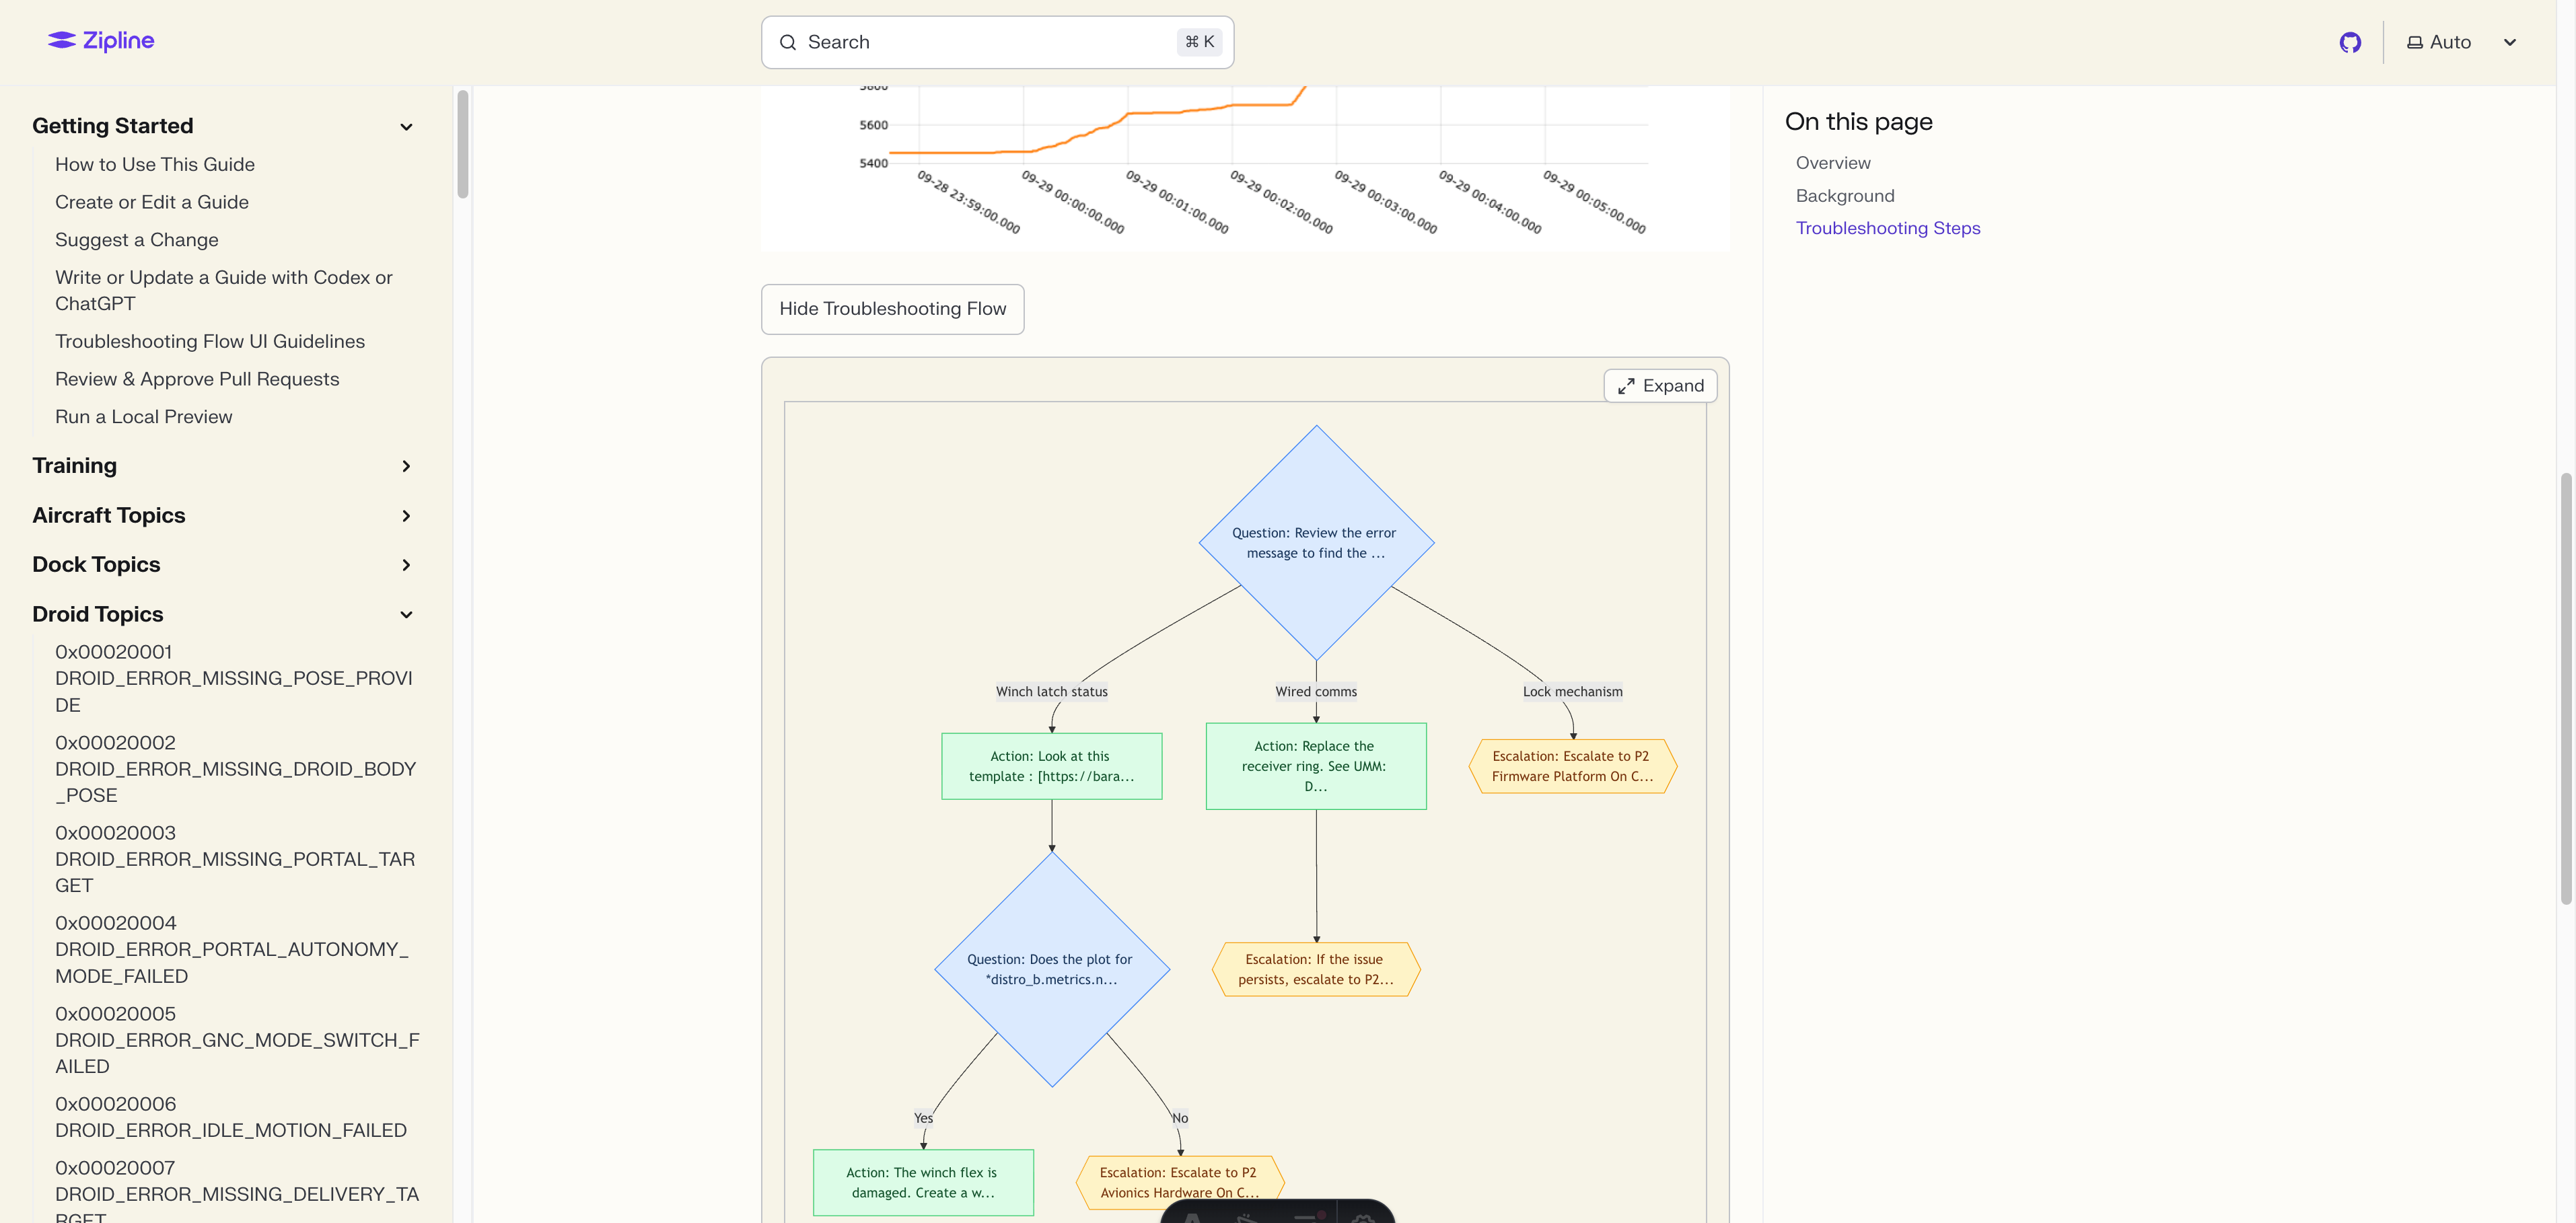
Section titled “The rendered flow diagram”The FlowVisualizer component reads topic.steps[] and renders a diagram. This is the picture a technician mentally walks through: rectangles for actions, diamonds for questions, paged shapes for escalations.
For the hardware engineer authoring a topic, the flow diagram is your sanity check: if the diagram has an orphan node, an unreachable branch, or three converging paths that don’t make engineering sense, fix the steps before you push. The same data backs both the rendered page above and this diagram — they’re two views of one source of truth.
Rendered flow diagram example