

Hover Zero Setting
Viewing this guide for
Troubleshooting Steps
Section titled “Troubleshooting Steps”graph TD
verify-firmware-tooling["<small><b>Step 1</b></small><br/>Action: On a smart cart, ensure that firmware..."]
verify-motor-firmware["<small><b>Step 2</b></small><br/>Action: Ensure that all motors are running th..."]
update-identifiers-file["<small><b>Step 3</b></small><br/>Action: Download the following identifiers fi..."]
mount-prop-alignment-jig["<small><b>Step 4</b></small><br/>Action: Mount the prop alignment jig onto the..."]
align-prop-alignment-jig["<small><b>Step 5</b></small><br/>Action: To mount the jig, align the alignment..."]
seat-propellers-in-grooves["<small><b>Step 6</b></small><br/>Action: Push the fixture against the shaft an..."]
sandwich-propeller["<small><b>Step 7</b></small><br/>Action: Sandwich the propeller with the other..."]
confirm-jig-install["<small><b>Step 8</b></small><br/>Action: Confirm that the jig is installed cor..."]
power-on-powertrain["<small><b>Step 9</b></small><br/>Action: Power on the powertrain and wait 10 s..."]
launch-motor-client["<small><b>Step 10</b></small><br/>Action: Launch motor-client2 by running the..."]
execute-calibrations["<small><b>Step 11</b></small><br/>Action: Inside motor-client2, execute the c..."]
end-manual-session["<small><b>Step 12</b></small><br/>Action: After all calibrations are complete, ..."]
verify-firmware-tooling --> verify-motor-firmware
verify-motor-firmware --> update-identifiers-file
update-identifiers-file --> mount-prop-alignment-jig
mount-prop-alignment-jig --> align-prop-alignment-jig
align-prop-alignment-jig --> seat-propellers-in-grooves
seat-propellers-in-grooves --> sandwich-propeller
sandwich-propeller --> confirm-jig-install
confirm-jig-install --> power-on-powertrain
power-on-powertrain --> launch-motor-client
launch-motor-client --> execute-calibrations
execute-calibrations --> end-manual-session
style verify-firmware-tooling fill:#dcfce7,stroke:#22c55e,color:#14532d
style verify-motor-firmware fill:#dcfce7,stroke:#22c55e,color:#14532d
style update-identifiers-file fill:#dcfce7,stroke:#22c55e,color:#14532d
style mount-prop-alignment-jig fill:#dcfce7,stroke:#22c55e,color:#14532d
style align-prop-alignment-jig fill:#dcfce7,stroke:#22c55e,color:#14532d
style seat-propellers-in-grooves fill:#dcfce7,stroke:#22c55e,color:#14532d
style sandwich-propeller fill:#dcfce7,stroke:#22c55e,color:#14532d
style confirm-jig-install fill:#dcfce7,stroke:#22c55e,color:#14532d
style power-on-powertrain fill:#dcfce7,stroke:#22c55e,color:#14532d
style launch-motor-client fill:#dcfce7,stroke:#22c55e,color:#14532d
style execute-calibrations fill:#dcfce7,stroke:#22c55e,color:#14532d
style end-manual-session fill:#dcfce7,stroke:#22c55e,color:#14532d Hover or focus a block to preview it. Select the block to keep the preview open.
1 action
On a smart cart, ensure that firmware tooling is
Use the following command if unsure:
zipline-firmware2-tools==0.0.0.dev2+anthony-parking-tooling.Use the following command if unsure:
pip install zipline-firmware2-tools==0.0.0.dev3+anthony.parking.tooling 2 action
Ensure that all motors are running the latest fixed-wing-capable firmware (
zip-2025.36-fixed-wing-rc4 or more recent). 3 action
Download the following identifiers file and update it on the smart cart. Drop it in
NOTE: If you do not know how to do this, reach out to @Anthony Berbari.
~/ipc-tools/:all_mcu_identifiers.pbNOTE: If you do not know how to do this, reach out to @Anthony Berbari.
4 action
Mount the prop alignment jig onto the hover motors, making sure to align the hover motor protrusion with the hole. Click Continue to see steps for mounting the jig.
NOTE: This must be completed for each motor before continuing to the next step.
NOTE: This must be completed for each motor before continuing to the next step.
5 action
To mount the jig, align the alignment hole with the protrusion on the hover motor.
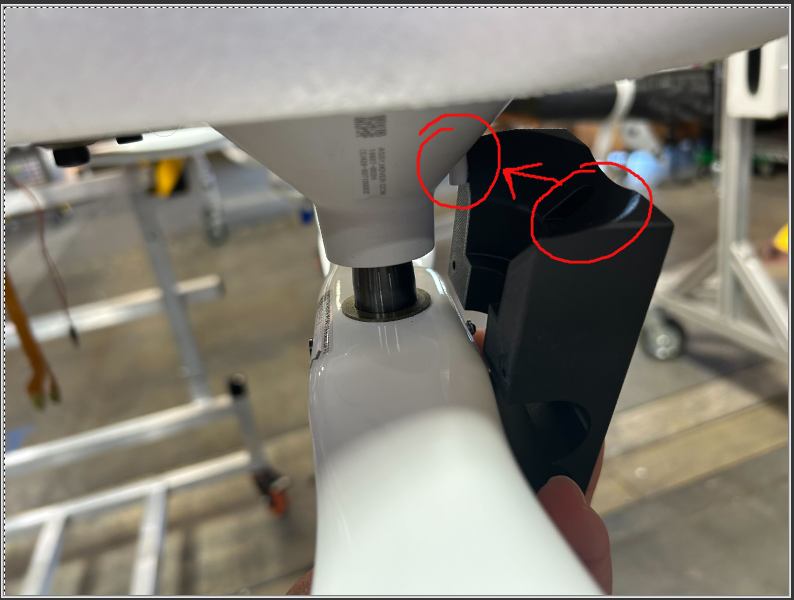
6 action
Push the fixture against the shaft and let the hover propellers sit in the grooves of the fixture.
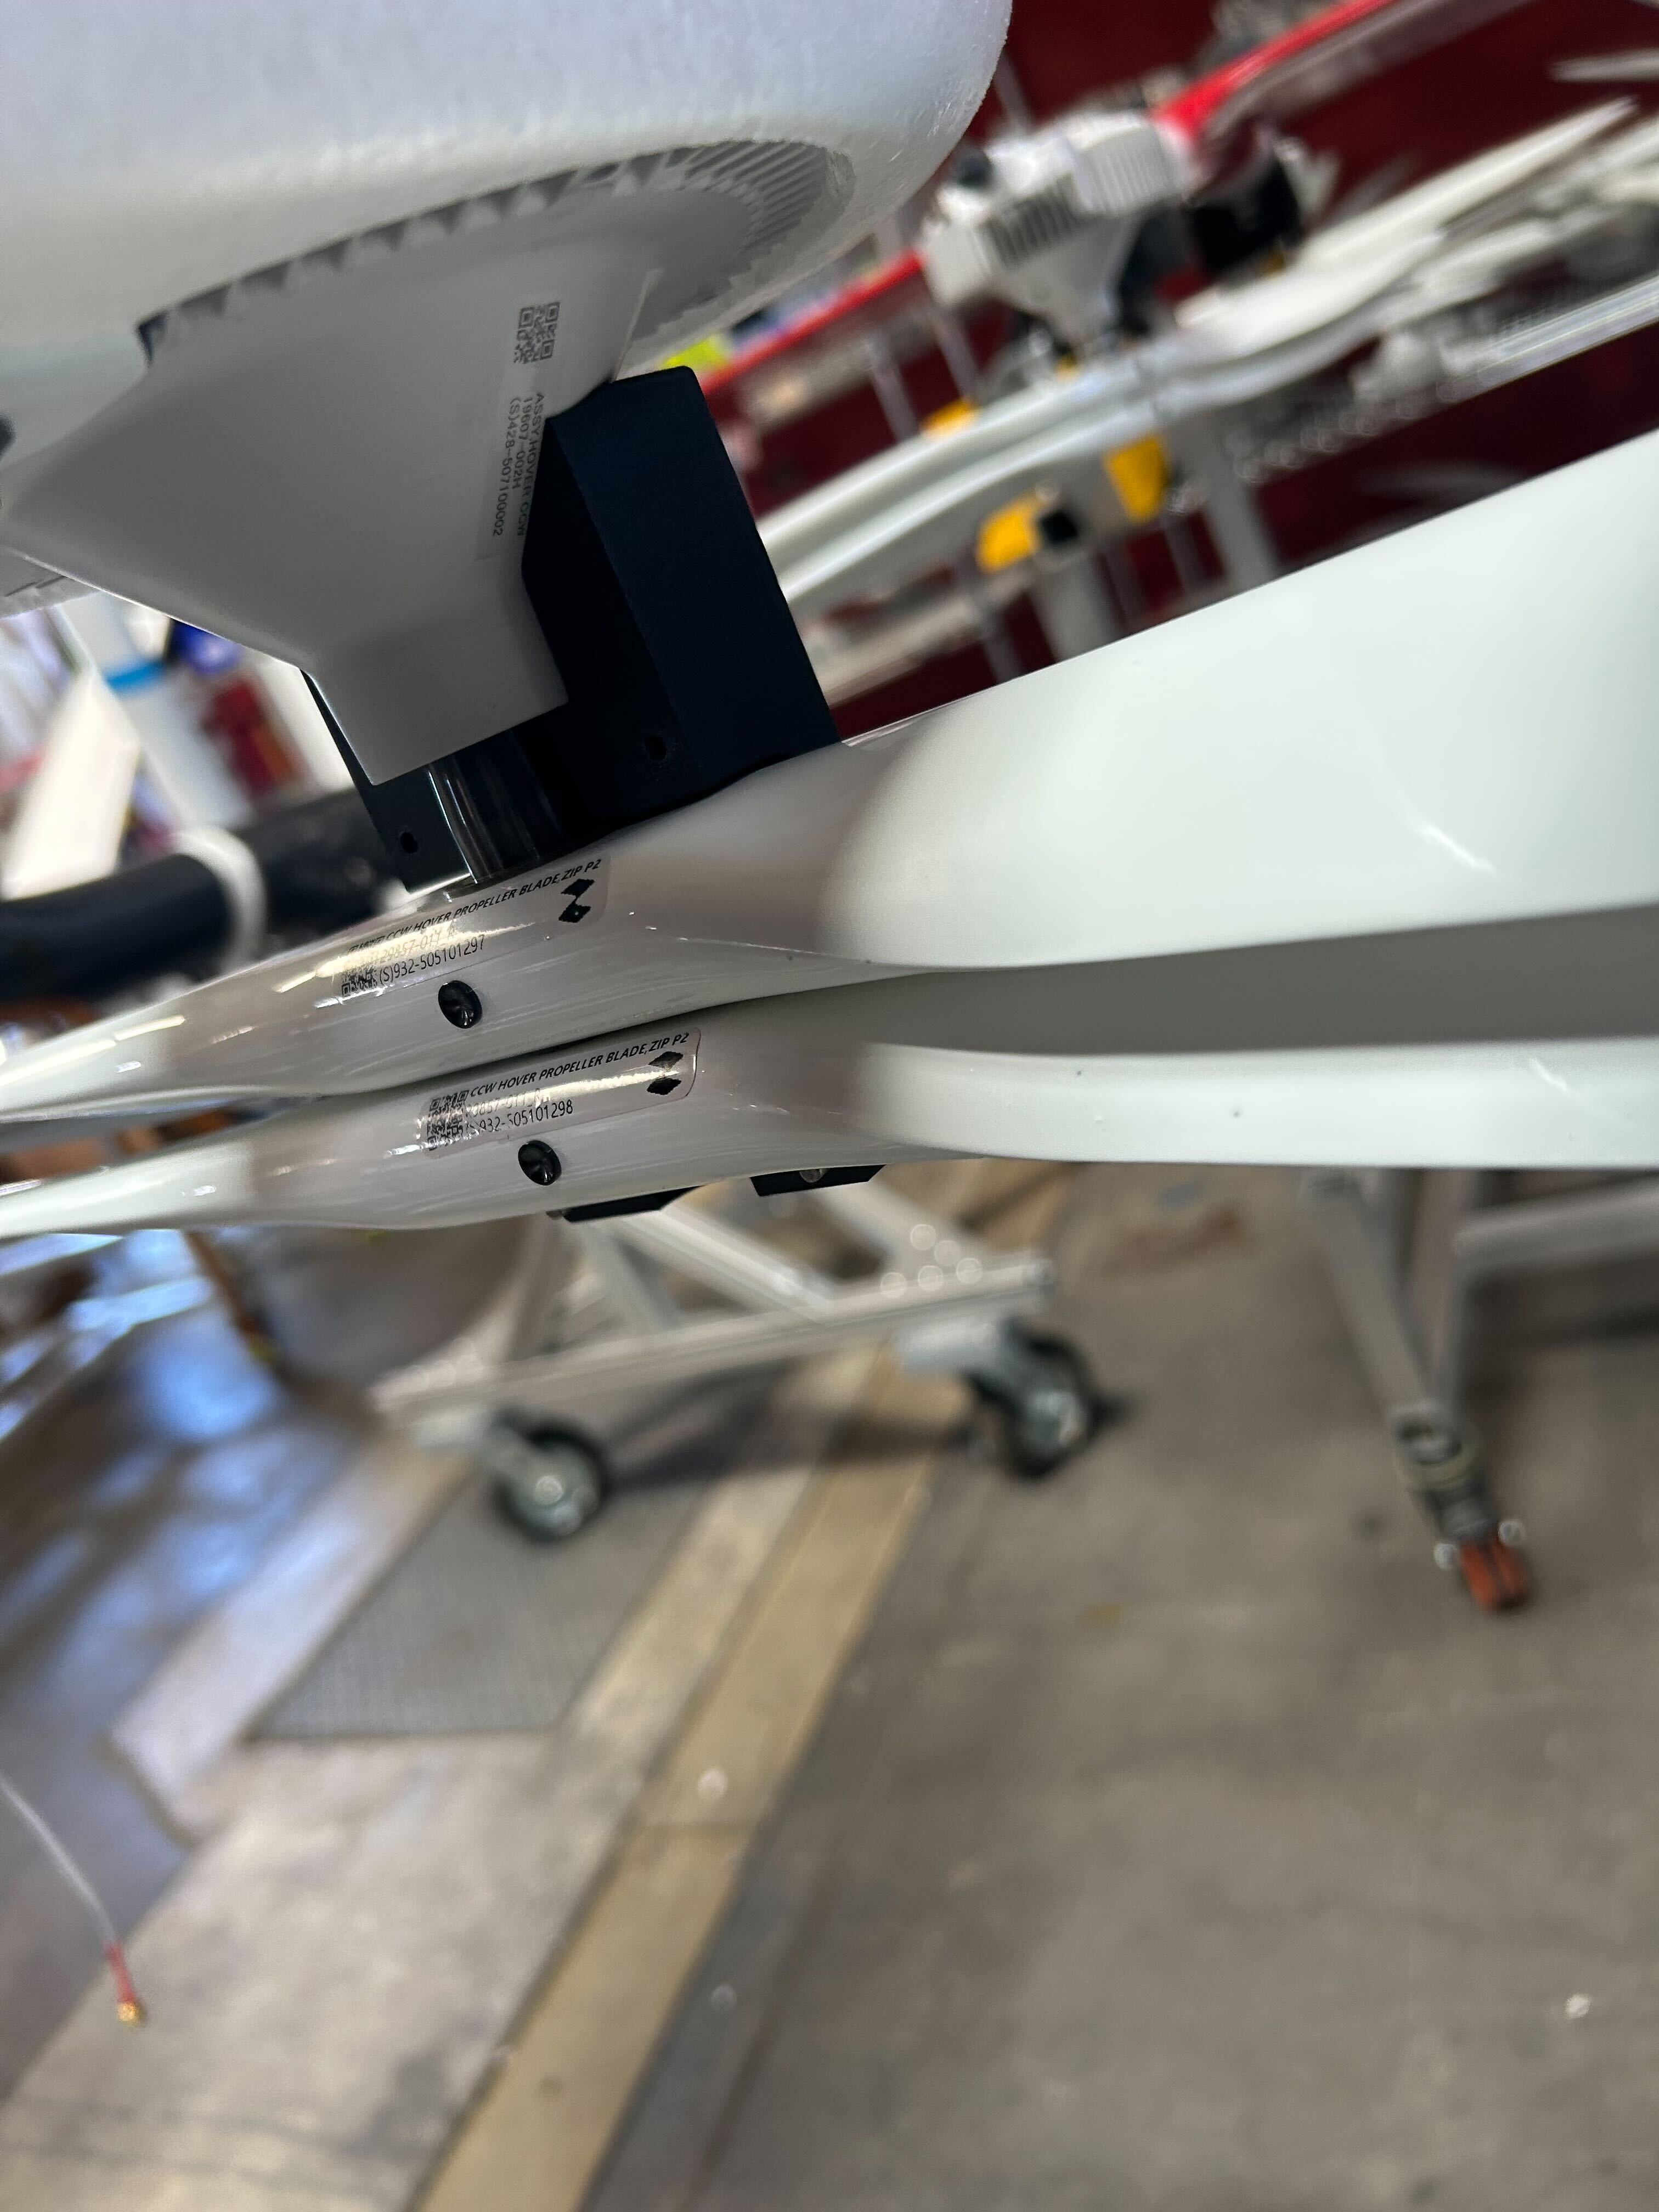
7 action
Sandwich the propeller with the other side of the jig.
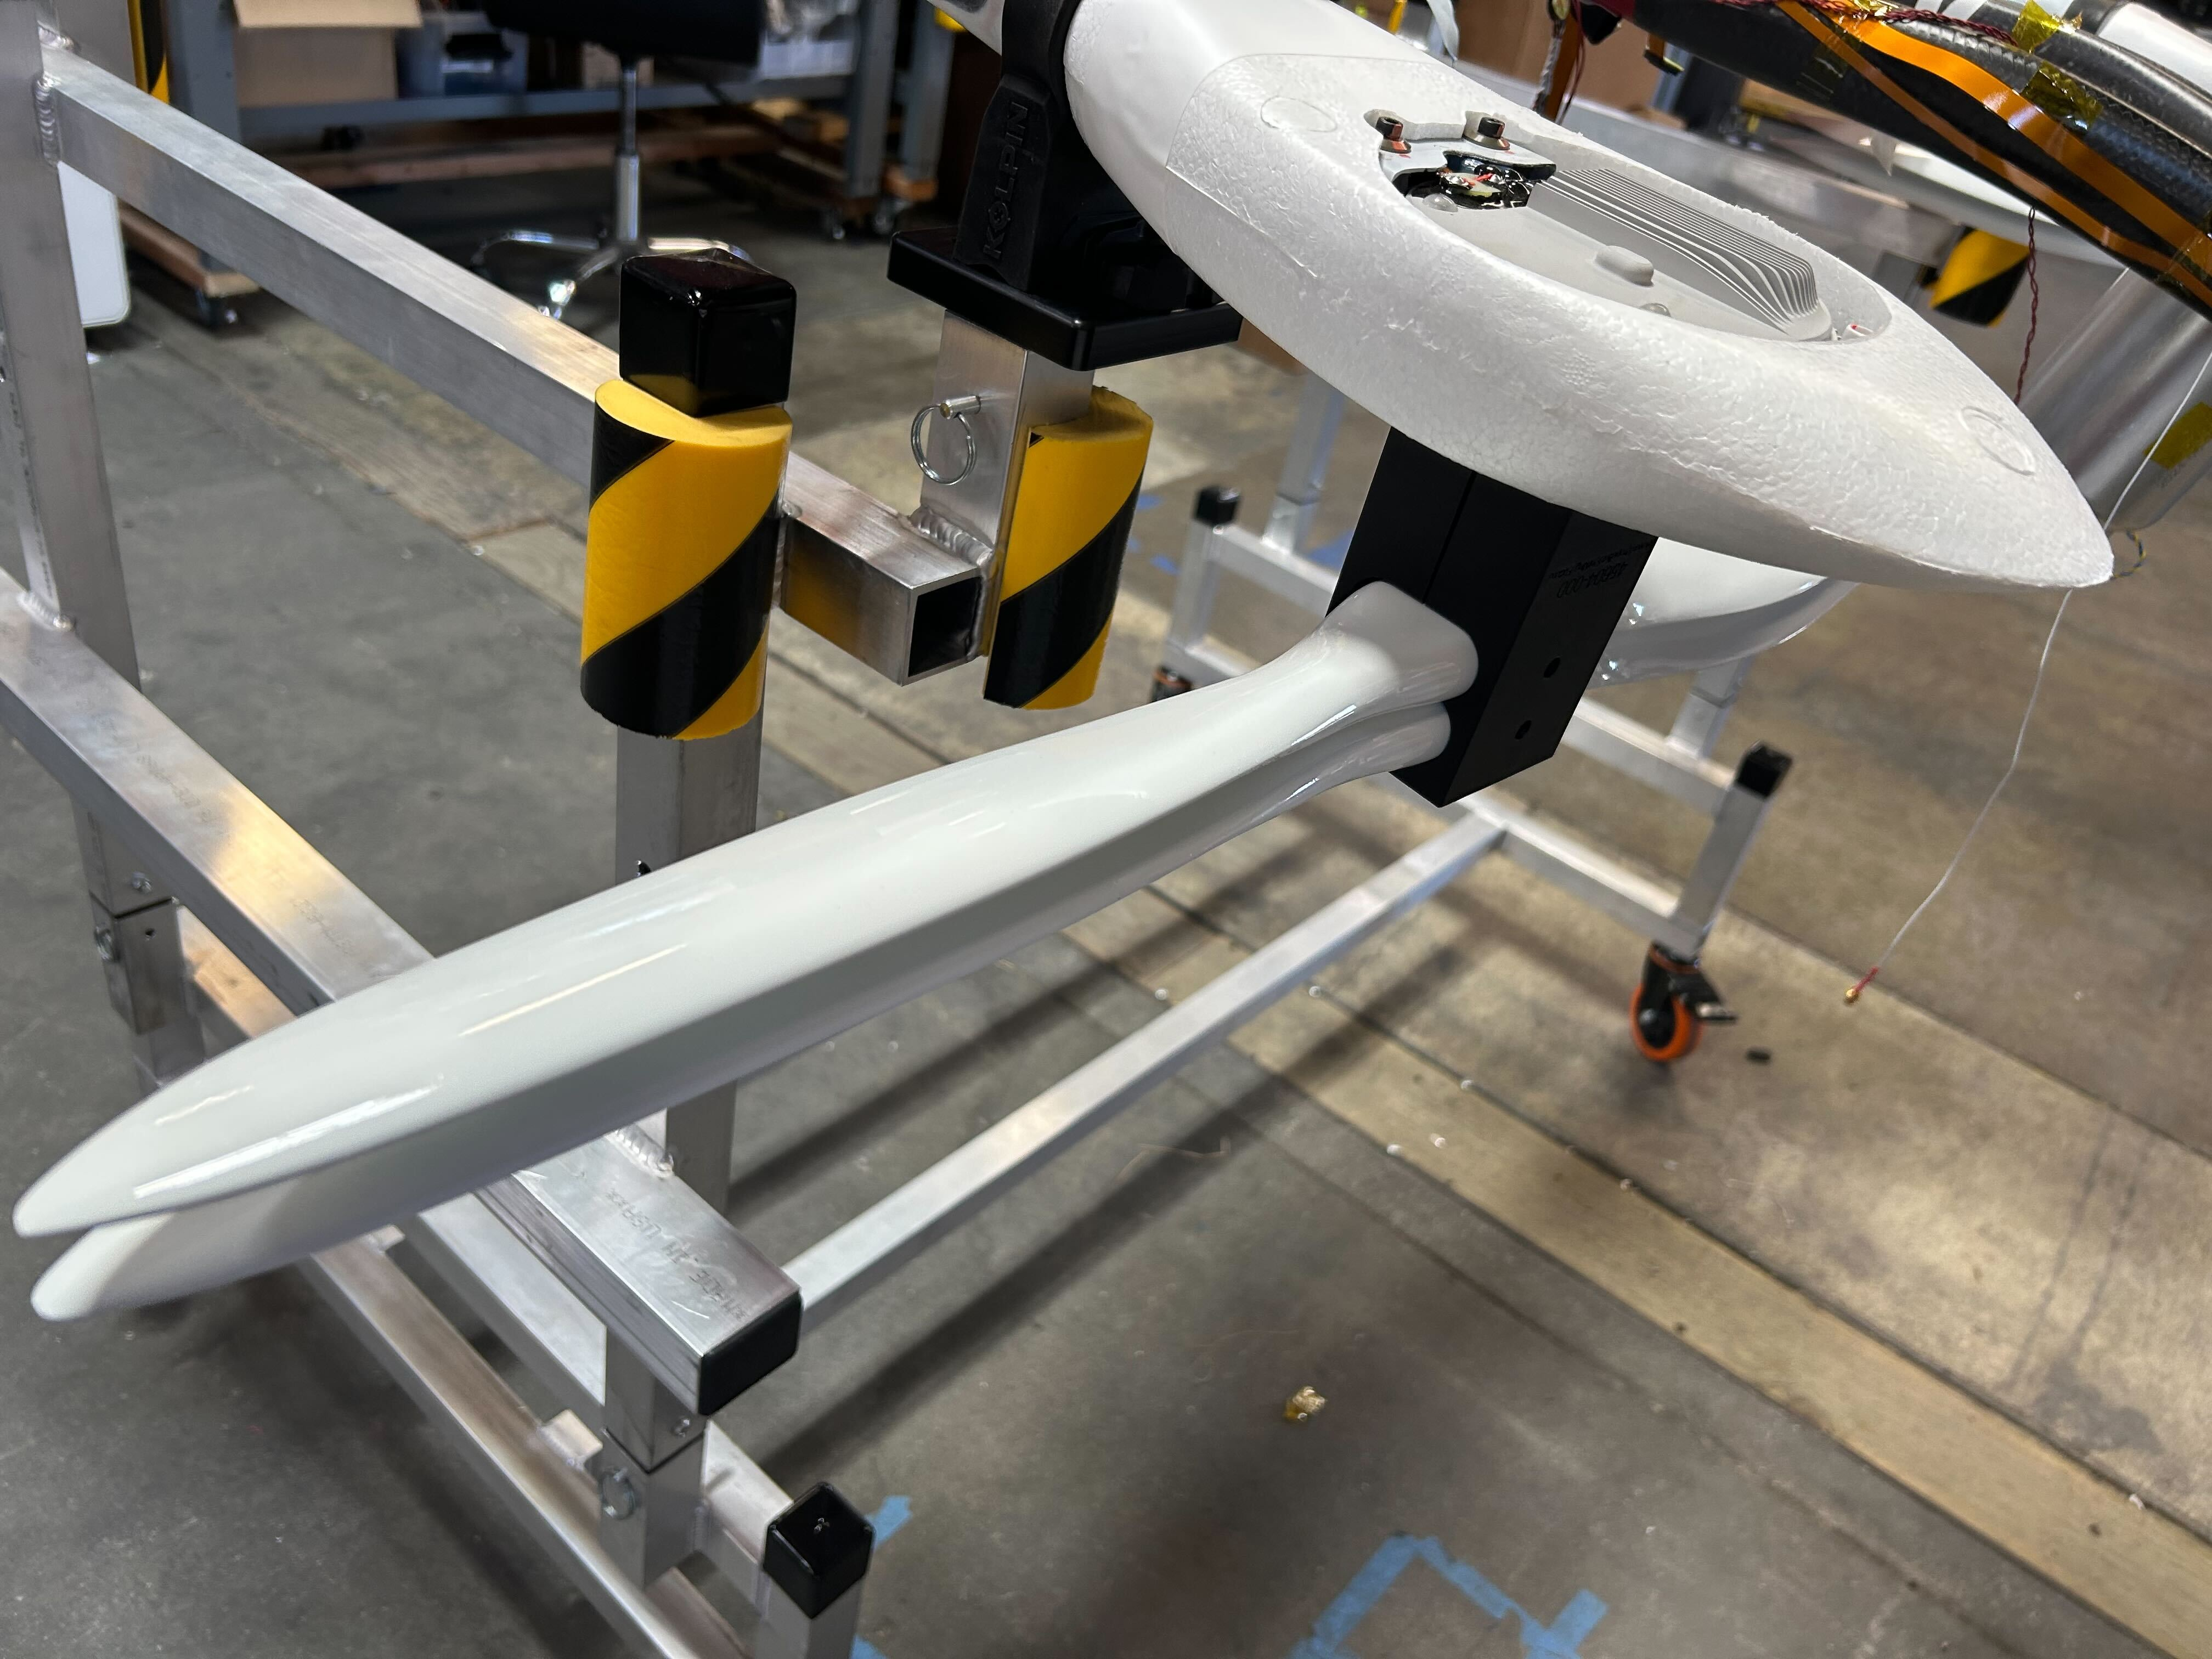
8 action
Confirm that the jig is installed correctly.
Attempt to rotate the hover propeller with your hands. There should be very little movement. Leave the propellers such that they are at roughly the center of whatever play exists.
Attempt to rotate the hover propeller with your hands. There should be very little movement. Leave the propellers such that they are at roughly the center of whatever play exists.
9 action
Power on the powertrain and wait 10 seconds for the nodes to boot:
fw-zip-power -i enp3s0 all-on 10 action
Launch
motor-client2 by running the following command:motor-client2 -p hover_stbd_fwd enp3s0 -p hover_port_fwd enp3s0 -p hover_stbd_aft enp3s0 -p hover_port_aft enp3s0 11 action
Inside
Example of a successful run
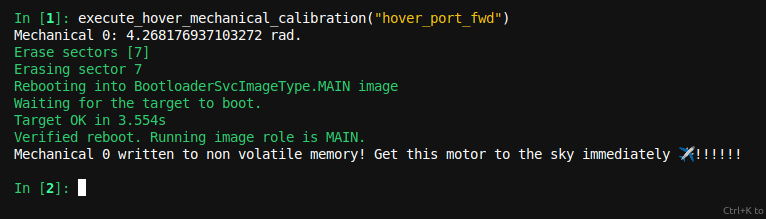
motor-client2, execute the calibration using the following command:execute_hover_mechanical_calibration("hover_port_fwd")Example of a successful run
12 action
After all calibrations are complete, run the following command to return the Aircraft power to its normal state:
fw-zip-power -i enp3s0 end-manual-sessionResolution note
This plaintext block is ready to paste into the Resolution Note field on the ZERP issue you're working. The permalink below gives engineering review access to the full step-by-step timeline including any back-navigation; share it if the case needs a deeper look.
Permalink:
Session is too large to fit in a URL. Use Download session JSON to share the timeline out-of-band.
Did this guide help you get unblocked?
Open suggestions
There are no open suggestions.
Open pull requests
There are no open pull requests.